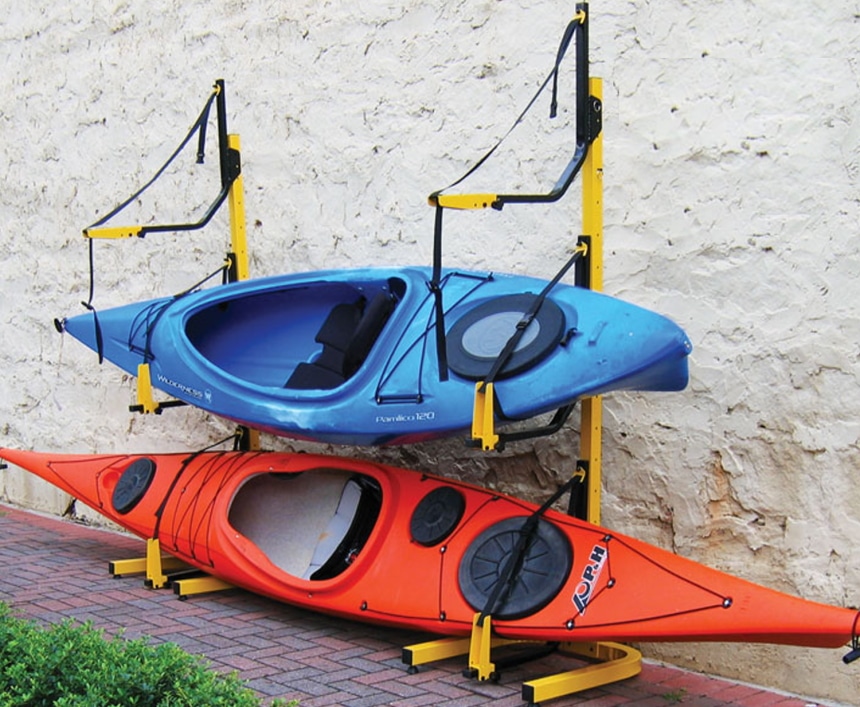

If you desire a kayak rack, whether it’s for your backyard or garage, there are two ways in which you can get it. The first is to buy a storage rack, and while this is quick and less strenuous mentally, it’s going to be costly. The other alternative is, of course, to build it.
If you own the right equipment or plan to buy some to start a DIYing hobby, we recommend building your own. It is inexpensive and very satisfying to complete. Admittedly, you may not be sure of how to build a kayak rack. However, we have you covered with the necessary instructions. Just follow the step-by-step guide below, and you should be done preparing the rack in a short while.
 If you’re serious about learning how to build a kayak rack out of wood, there are two ways to go about it. The simpler way is to use mechanical
fasteners
Trusted Source
Fastener - Wikipedia
A fastener (US English) or fastening (UK English) is a hardware device that mechanically joins or affixes two or more objects together. In general, fasteners are used to create non-permanent joints; that is, joints that can be removed or dismantled without damaging the joining components.
en.wikipedia.org
, e.g., bolts and screws, and that will make your work a lot easier. Alternatively, you can choose to work without them and make your project more challenging.
If you’re serious about learning how to build a kayak rack out of wood, there are two ways to go about it. The simpler way is to use mechanical
fasteners
Trusted Source
Fastener - Wikipedia
A fastener (US English) or fastening (UK English) is a hardware device that mechanically joins or affixes two or more objects together. In general, fasteners are used to create non-permanent joints; that is, joints that can be removed or dismantled without damaging the joining components.
en.wikipedia.org
, e.g., bolts and screws, and that will make your work a lot easier. Alternatively, you can choose to work without them and make your project more challenging.
For beginner DIYers starting with the mechanical fasteners seems to make a lot more sense. This is because you want to minimize your chances of failure as much as possible and mechanical fasteners will likely help you do that.
Step 1
As with any other woodworking project, you start by acquiring the materials and the tools for the job. Some of the devices you need may include a mallet, spirit level, tape measure, framing square, screwdriver, sander, safety glasses, safety gloves, jigsaw, pocket hole jig, drill machinery, drill bits, and a carpentry pencil.
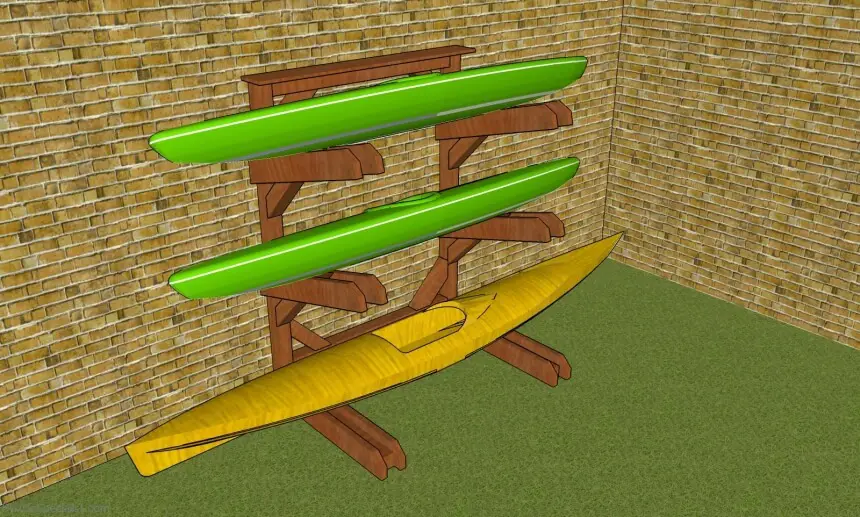
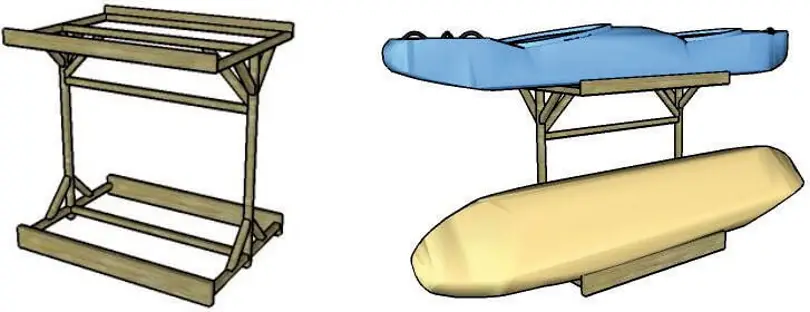
In this guide, we are going to be building a three-kayak rack. As such, the materials you’ll need are as follows:
If you have the right cutting equipment in your woodworking shop, you can purchase longer 4×4 and 2×6 lumber pieces, then cut them up later to fit the dimensions you need. According to users, the DEWALT DWE7485 is an excellent table saw for cutting rip and crosscuts without much fuss. It has all the right fence rails to make adjustments and to cut smoothly. As a side benefit, it is even made compact for easier transport.
Getting some practice in making both cross and rip cuts may do you some good in the long run. However, if you don’t feel quite up to it, you can always purchase ready-cut lumber. That said, always check the lumber for flaws. Rot or a crack in the wrong place means the whole rack could come down at the slightest provocation. Knots and twists in the wood are generally bad signs as well.
Also, getting cedar or another type of water-resistant lumber is a good idea. Since the kayaks come into contact with water regularly, your rack will last longer if made of water-resistant wood.
Step 2
 You start by building the frame. While the rack has functional value, you want it to be good-looking as well, and you start to make this happen when making the base. Take the 60” long 2×6 pieces of lumber and round the top corners. You’ll need a jigsaw for this part of the job. Also, drawing on the side of the wood may help you get this right.
Once you’re done rounding the corner, you sand the part to give it a smooth finish. A tool like a belt sander should help you get done with this quicker. Alternatively, the Makita XOB01T is, according to past users and reviewers, an excellent random orbit sander machine that you can get for the job. It is wireless, comes with a 32-minute runtime, and has variable speed settings. This would make it ideal not only for this kayak rack building project but also for other woodworking projects.
After that, you put the pieces of the base together. Put the 38” 4×4’s between two pieces of the rounded 2×6’s. Align the edge of the 4×4 with the top of the rounded 2×6 lumber. That way, you won’t have any piece of the 4×4 popping out at the front. If you have clamps, now would be a good time to whip them out and use them to hold the base together. That said, an extra pair of hands may also work as an alternative.
Slide the longer 4×4 upright lumber pieces in behind the 38” 4×4’s. Since they’re the same width, they should also fit perfectly in between the rounded 2×6’s. If the corners are square, you can now start to attach the pieces permanently.
Drill pilot holes into the 2×6 base beams as well as into the uprights. After that, you can fasten them together using the 7” carriage bolts. As for the 38” 4×4’s already in the base, you can attach them using the 2½” screws. It’s also a good idea to drill pilot holes before you insert the screws.
The resulting structures should be two ends of the kayak rack frame with rigid bases. These should be capable of remaining upright by themselves.
Step 3
 Step 3 involves adding the rack supports to the two pieces of the frame you made in step two. You’re going to use the remaining 2×6 pieces of lumber. If you followed our instructions and got all the materials, there should be about eight of them. However, they aren’t ready to be fitted just yet and need some modifications.
You’ll need to make 15° cuts on one end of each beam. A miter saw is the best tool for this part of the job since it has the parts to help you dial in the angle. Many previous DEWALT DWS716 users recommend getting the machine, especially if you’re a beginner in the woodworking space. In fact, with the DWS716, you can dial in any angle between 0 and 48 degrees using the double bevel design to your advantage.
On the opposite end, you’ll need to round the exposed corner as well. The jigsaw will once again come in handy. Remember to sand the two ends once you’re done. After that, measure 21 inches from the base of the frame and mark the uprights. This is where you’ll attach the supports. A point to note is that your measurements should start from the top of the base beams.
The second support marker should also be 21 inches from the first. Next, you place the angled end of the support beam on the marked area of the upright post. The edge of the support beam should be flush with the edge of the upright. Consequently, the support beam should also be tilted slightly upwards.
You will need to use two 7” carriage bolts to hold the support beams in place. Additionally, there should be another support beam on the opposite side. You also want the support beams to be more stable, so you’re better off adding braces below them.
One end of each 27” 4×4 piece of lumber will need to be cut at an angle of 45°. The opposite end should be cut at a 30° angle. The 45° end will be attached to the upright, while the opposite side will be attached to the support beam. For stability, use some of the 2½” screws you have in your toolkit. You might need to drill pilot holes to ensure the screws are in the right positions.
Step 4
This step is more or less completing the backside of the frame and attaching the two ends of the rack. Since the lumber pieces for this section are already cut to size, the only thing left is to connect them. Place the two assembled rack ends about 48½” apart. After that, add the 48½” 4×4’s to the setup. One should be placed just above the base beams, while another should be under the top support beams.
Drill pilot holes into these back frame 4×4’s and then use the screws to permanently attach them to the rest of the rack. Again, you don’t want the rack falling apart, so you might be better off adding braces to the back frame as well.
Since these are cross braces for a 90° angle, cutting each end of the 16” 4×4’s at a 45° angle should be enough preparation. After that, it’s a matter of aligning the braces with the right beams and then drilling in the screws to attach them permanently.
Step 5

Now, all that’s left are the finishing touches. Add some wood filler to the holes you left in your project for a neater look. Sanding is also a priority. If you have a random orbit sander, it should make light work of this part of the process. Eliminate any splinters that might cause you injury or damage the kayak.
After that, you can paint the whole kayak rack. Some extra parts that might benefit you and your kayak rack are HDPE plastic, an extra 4×4 piece of lumber, and neoprene rubber sponge strips. The HDPE plastic should be cut to size and fitted under the rack. This is especially true if you’re going to store the kayaks in a wet area. It will help keep the rack above the water, making it less prone to moisture damage.
As for the extra piece of lumber, it can give your project a better finish if you add it to the top of your rack. Lastly, the sponge strips can be placed on the support beams to ensure that neither the kayaks nor the rack is damaged during storage.
You are now done with the rack assembly and can add your kayaks. One, of course, will be placed on the base beams, while the other two should fit on the support beams.
Step 1
First, the materials you need. They include the following:
As for the equipment list, you will still use the same tools as you did with the first kayak rack design. This includes a mallet, spirit level, tape measure, framing square, screwdriver, sander, safety glasses, safety gloves, jigsaw, pocket hole jig, drill machinery, drill bits, and a carpentry pencil.
Step 2

We’re assuming you already have the wooden planks in the dimensions mentioned above. As such, all that’s left is to put the rack together. Start by assembling the frame that will run from the ground to the top of the rack.
For this part of the rack setup, you’ll need both the 51½” and the 51” planks. Measure 2” from one end of the longer plank and mark it. On the opposite end of the 51½” you’ll need to measure 12” from the edge as well and mark it. Do this for both pieces of the 51½” lumber that you have.
Once done, align the smaller 51” planks with these markings and attach them using screws. Drilling pilot holes ensures nothing goes wrong when you do eventually push the screws through. The resulting frame should be four-sided. Also, since the planks used have similar dimensions, the edges should be flush against each other with no components popping out.
Step 3
With the frame done, you move on to the base. For this section, pick out the 18” 2×6’s that you have lying around and connect them to the uprights in the frame. They should be 2” from the bottom. You won’t have to measure this a second time, as the 51” bars you previously attached can act as markers.
Attach two 18” planks on opposite ends of the upright. They should each be angled at 90 degrees away from the 51” plank. Repeat this for the other upright as well. Drill pilot holes and drive the screws in once the wood is well-positioned.
At the ends of the attached 18” wood pieces, you can now add the 54” planks. The clearance between the bottom of the 54” plank and the attachment to the 18” lumber should be 2”. This will allow the supports to be on the same level as the uprights for optimal balance.
Step 4
Now you assemble the top rack. The basic design should be slightly similar to the base. As such, it won’t be challenging to pull off. Pick the three pieces of 2×2 lumber that are 51” long meant for the top rack and place them side by side.
After that, pick the two pieces of 2×2 lumber that are 39” long and place them on the ends of the 51” planks. Align them so that two of the 51” planks are flush with the edges of the 39” pieces of lumber. As for the third 51” plank, it should fall right in the middle of the other two. To be specific, it should be 19.5 inches from the edge of both 39” planks.
Drill pilot holes and use the right-sized screws to attach these components permanently. After that, add the 1×4 54” planks next to the 51” planks and connect them using screws. The top rack is complete and can be added to the top of the uprights. Again remember to fasten this section using screws.
Step 5
 To make sure the rack is more stable, you then need to add braces. The miter saw will come in handy for this section of the build. Cut the 17” braces at 45 degrees on both ends. These will be positioned between the top rack and the 51” plank that forms part of the frame. Fasten them with screws for rigidity.
The other 12¾” long also needs to have 45-degree cuts on both ends. Use them to prop the uprights against the base and the top rack against the uprights. For finishing touches, sand the whole rack and add paint. This completes your rack-making project.
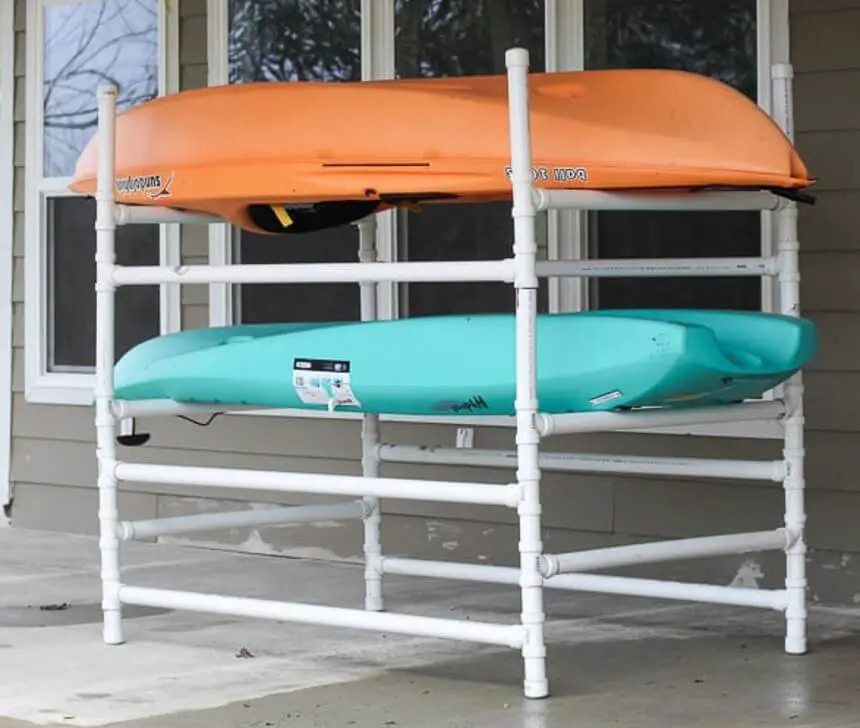
Learning how to build a kayak rack out of PVC is easier and cheaper than using wood. You also don’t need as many tools for the process. Listed below is a list of everything that you’ll need for the job.
In total, you should have about 63 feet of 1¼” PVC pipe. That said, you need to account for errors and mistakes, and it’s safer to round off that figure to between 65 and 70 feet of pipe. Make sure that you choose a durable pipe for the project so the rack can last longer.
Also, it’s unlikely that you’ll find a 70-foot piece of pipe in the market. However, you can still buy the most extended pipes that you can find in the market. This will allow you to cut them into the required sizes once the pipes are delivered. Also, remember to buy matching tees and endcaps.
 You start by cutting the PVC pipe to size. Use a tape measure and a marker to ensure you get the measurements of each pipe right. Without the right tools, people tend to use alternatives to cut the PVC pipe. Some examples include a hacksaw or even a miter saw if you’re more used to woodworking projects.
However, the resulting pipes might need to undergo a deburring process to get them ready for the project. Of course, this is a waste of time and resources, which means that it’s generally better to invest in a PVC cutter that will leave nice clean cuts on the pipe.
Once cut, organize all your pipes somewhere close according to the type and size.
 You will need to create four posts for the rack. This is where the 4-inch pipes, end caps, and tees come most in handy. First, attach one of the 4-inch posts to an end cap. Follow this up by connecting a tee on the opposite side of the small pipe.
After that, add another 4-inch piece of pipe to the tee. Of course, one end of the first tee will be left open. After the second piece of 4-inch PVC, add another tee. This time make sure that the open part of the tee is angled at 90 degrees away from the first one.
Add another 4-inch piece of PVC pipe and another tee. For the third tee, make sure the blank end faces the same direction as the first tee. Next, add a 4-inch PVC and a tee that faces the same direction as the second tee.
At this point, your post should consist of four 4-inch pieces of pipe as well as four tees. Now you can attach one of the 1-pieces of PVC that you have lying around. You will still need to add a tee on top of it. Remember to adjust the angle to 90 degrees away from the previous tee.
After that, add the 4-inch pipe, a tee, another 1-foot pipe, and an end cap. This should complete the first post. When you look at your handiwork, the blank sections of the tees should be at alternating 90-degree angles.
Repeat this process until you have a total of four posts to work with.
 The next step involves placing the posts side by side and connecting them using the other pipes. Start with the 3-foot pieces of PVC pipe you have. At the top ends of the posts, add the 3-foot pieces of PVC at the first tee. After that, only attach 3-foot pieces of pipe to the tees facing the same direction as the one at the top. There should be four of them at alternating intervals.
Once you’re done with that, put the remaining two posts together using the same procedure. Consequently, you should have two ends of the kayak rack assembled. As for the finishing touches, you line up the ends across each other and use the longer 5-foot pieces of pipe to connect them.
For this, slide the PVC pipe into the tee and then match it to the corresponding tee on the other end of the kayak rack. Repeat this process with the other 5-foot pieces of the PVC until the structure is complete.
If you’re satisfied with how your creation turned out, you can then set out to ensure the device doesn’t come apart while it’s holding up your kayaks. This is why we insisted on having purple primer and PVC cement. You can detach the various component and add the primer and cement. Focus on one connection at a time so the whole rack doesn’t come apart.
Finally, place your kayaks on the rack, and you’ll be done. Your creation should hold about three kayaks. Also, you can change some of the measurements of the pipes if you want to make a bigger rack to hold the same number of kayaks. For instance, you can change the 1-foot pieces of pipe to 1.5-feet. However, be aware that the resulting structure will take up more space in your garage or shed if you do this. This concludes our guide/tutorial on how to build a kayak storage rack.
In addition to acquiring a rack, you also need to know what you are and aren’t allowed to do during storage to keep your kayak from getting damaged. For one, you can keep your kayaks outside but only for short periods, especially during the on-season. However, keep the kayaks covered from the sun to prevent damage. Some structures and equipment that might help include decks, roof, covered porches, tarps and UV-resistant kayak covers.
If you store the kayaks indoors, keep them away from windows and other fixtures that allow direct sunlight into the room. It might help to add a tarp or UV cover when storing your kayaks indoors as well. Also, be careful in how you place the kayaks on the rack. If you repeatedly do it carelessly, the kayak might accumulate damage over time. This applies whether you store the kayak indoors or outdoors. Another demerit of storing kayaks negligently is that they may fall on the people walking below them.
Depending on the material used to make the kayak, heat could distort the body. Consequently, keep it away from extreme sources of heat that might lead to irreversible damage. Even extreme cold may damage the kayak, although the changes will be more gradual.
If you’re storing the kayak for the short term, keep it somewhere accessible where you can take it out and return it at a moment’s notice. If, on the other hand, you’re storing the kayak for the long term, store it somewhere where it won’t interfere with the movement of other things you need daily. This keeps contact minimal and will likely keep damage low in the long run.
While it may not be necessary to clean your kayak daily, you should definitely put some extra effort into it if you’re putting it away for a while. Also, here are some things to avoid doing during kayak storage and transport.
As demonstrated above, learning how to build a kayak rack is not as difficult as it might first appear to be. However, you need a set of tools, suitable raw materials, and a willingness to try building new things. You can use the information above to build your first kayak rack. That said, there is no need to stop there. Experiment more with both PVC and woodworking projects, and soon you’ll be a proficient DIYer. That said, if you want a kayak rack for your truck, you’re probably better off buying one since they require high-level metalworking skills.